Do you love camping and want to know how to sanitize RV fresh water tank components safely?
This vital task is part of routine RV maintenance, and this guide will lead you through all the steps. Inside, we explain the ins and outs of cleaning and sanitizing the storage tank and plumbing lines that carry your fresh water supply to your RV sink, shower, and toilet.
We also explain why clean water is essential, which products and methods are best to sanitize your RV water tank and provide tips to keep it that way during the camping season.
Why Sanitize Your RV Water Tank
Any standing water will eventually grow bacteria that can multiply enough to cause illness or odors in an RV freshwater holding tank and plumbing lines to your camper’s faucets and toilet.
Leaving water in your freshwater tank or having small amounts pool in your water lines during months of storage or weeks between camping trips will allow bacteria to flourish. Without cleaning the RV water system to kill these germs, you’ll only spread them to your whole water supply when you add more water to your camper.
RVing experts recommend sanitizing your freshwater system at least once every six months to reduce the chance of issues. You should also use an RV tank sanitizer if you’ve left water in the tank for an extended length of time during hot weather, such as between monthly summer camping trips.
Sanitizing Your RV Water Systems (Video)
Not every RV has a freshwater holding tank, nor does everyone with a camper with a tank use it. Instead, most RVers rely on holding tank freshwater during road travel, while boondock camping or if a campground has to shut off the water supply to fix lines.
While everyone should fill their freshwater tank with a safe, potable water source, there is always a chance of introducing dangerous microbes into the system.
Using the freshwater tank to wash dishes, brush teeth, or shower means you could ingest harmful bacteria or pathogens hiding in the system, so keeping the water safe is critical.
Best RV Tank Sanitizer Products
Here are the top ways RVers sanitize their freshwater tank:
BLEACH
The RV fresh water tank bleach method to sanitize the system is the most common because it’s easy and affordable.
You can use any chlorine bleach brand, but you must follow the directions in the section below on how to sanitize your camper water tank to ensure you do it correctly.
DETERGENT and BLEACH
This method to clean the RV water tank starts with a detergent to wash out any grime or dirt in the tank and plumbing lines. After rinsing and draining the tank, you refill it and sanitize it using bleach.
The Thetford Fresh Water Tank Sanitizer Detergent and Sanitizer Treatment is a popular example of a two-part cleaning system.
WATER SYSTEM FLUSH
An RV water system flush product, like the Star Brite Aqua Water Tank and System Flush, will deep clean all freshwater tank and water line components. The chemicals will remove scale and other build-ups from hard water, as well as deodorize and sanitize.
The Camco TastePURE Spring Fresh Water System Cleaner and Deodorizer is another top choice among RVers.
WHITE VINEGAR
Some people prefer to sanitize their RV water tanks with vinegar to remove hard water deposits from inside the RV water heater and plumbing lines while killing bacteria.
This method requires draining the freshwater and water heater tanks, then adding very hot water (130°F) to your freshwater holding tank with a 50/50 ratio of white vinegar to the water.
After you top off the tank, turn on the RV water pump and run the solution through your water heater and cold and hot water taps. Most people run a hose from their home’s hot water tank to the inlet for the RV fresh water tank to accomplish this task.
Once you smell vinegar water coming out of all the taps, you close them and let the solution sit overnight. Afterward, drain the tank and lines, rinse with clean water until the vinegar smell is gone, and refill the freshwater tank as normal.
Using this method is not suitable for all RVs or water heaters, so check your owner’s manual to ensure it won’t cause damage.
SANITIZING TABLETS
Some people prefer to use RV fresh water tank tablets to sanitize their system, primarily if they use it for drinking or cooking.
The tablets dissolve to sanitize a specific number of gallons of water. For example, a single Aquatabs Water Purification Tablet will clean four gallons of water which means you’ll need to use 3-15 tablets depending on how large your camper’s holding tank is.
Always dissolve the tablets in a small amount of water before adding them into the freshwater inlet port using a funnel.
WARNING: Sanitizing tablets for freshwater tanks in RVs should not be confused with the drop-in tablets or packets used to clean and deodorize the black water holding tanks. Tablets for recreational vehicle toilets can include harmful chemicals, so never place them inside your freshwater holding tank.
RV Fresh Water Tank Sanitizing (Video)
Steps for How to Sanitize Camper Water Tank With Bleach
Please follow these steps if you plan to use bleach to clean your RV water tank. Please follow product label instructions for other methods to clean, deodorize, and sanitize an RV freshwater system.
It typically takes 12-24 hours to complete the sanitation process, so give yourself plenty of time to perform this task.
TIP: Hook up your RV grey and black water tank sewer hose to an appropriate sewer drain line so you can easily empty the tanks as they fill during this project.
1. Turn off the RV Water Pump and Water Heater and Drain the Tank
Start the sanitizing process by turning off the RV water heater and letting it cool down or bypassing the water heater if you prefer.
Find and open the drain plug for the RV freshwater tank. If you recently put in clean water, you should only drain out about half the water. If the water is old, drain it all out.
TIP: If you open a faucet or two inside the camper, it will let air into the plumbing lines and allow the water to drain out faster.
After the tank and water lines drain, close the faucets and replace the drain plug on the freshwater tank.
2. Add Bleach Solution and Water to the Tank
Check your owner’s manual for the capacity of your freshwater holding tank. You will need one cup of bleach for every ten gallons of water the tank holds. For example, a 30-gallon tank will require three cups of bleach.
TIP: It’s best to mix your bleach into a gallon or two of water in a clean bucket and then pour this solution into the exterior freshwater inlet using a large funnel. Some freshwater tanks have a port on the top to pour in the bleach, but it can be hard to access from your RV interior.
Once the bleach is in the tank, fill it up the rest of the way with fresh water from a city tap.
3. Run the Bleach Solution Through the Plumbing System and Top Off the Tank
Next, turn on your RV water pump and start opening sink faucets one at a time until you smell bleach water coming out, then shut the tap.
Don’t forget to run the shower and flush the toilet until the bleached water flows out, then shut them off.
After the water lines are full of bleached water, please turn off the water pump and add more clean water to the freshwater tank until it’s full.
Explore the Great Outdoors with Us!
4. Let the Bleach Water Soak
To ensure the proper sanitation of the RV water tank and plumbing lines, you must let the bleached water sit for a minimum of 12 hours. You can leave the bleach solution overnight or up to 24 hours, but after that, it isn’t going to increase disinfection.
5. Drain Bleach Solution and Flush the System
After letting the bleach solution soak for at least 12 hours, make sure the water pump is off, then open the plug for the water tank and open a faucet to drain out the system.
If you have a threaded drain plug at the bottom of your freshwater tank, you can connect a hose and let it flow into a sewer drain. However, the ratio of bleach to water should not harm the grass if you want to drain the tank directly onto the ground. If you’re sanitizing at a campground, ask staff how to handle the drain water.
Another option is to turn on the water pump and run a faucet until the freshwater tank empties. If you go this route, please don’t forget to open your greywater waste tank valve so the water will drain through the connected sewer hose and into the sewer line.
Once the water lines and the tank is empty, refill them with clean water. Run the pump, or leave the freshwater intake hose connected to run the clean water through all the hot and cold taps until you don’t smell any bleach. Run the shower and flush the toilet several times as well.
The chlorine odor should quickly dissipate if you don’t overdo the bleach ratio in the freshwater tank.
TIP: If you put too much bleach in, you may smell it for up to a week or more of everyday RV water use, so don’t think more will sanitize better. The last thing you want is to drain all the water again to remove the excessive bleach residue.
6. Turn on RV Water Heater and Replace Water Filters
After you’re happy with your RV water system’s cleanliness, you can open the bypass valves and turn the water heater back on. Now is also the best time to exchange any water filters in your RV for drinking or ice-making.
Use an RV Water Heater (Video)
How to Reduce RV Water Tank Odors and Germs
Here are some suggestions to keep your freshwater as clean as possible between sanitation sessions:
- Always sanitize your RV freshwater inlet port and hose ends before use
- Use an inline water filter between your RV water inlet and city water spigot
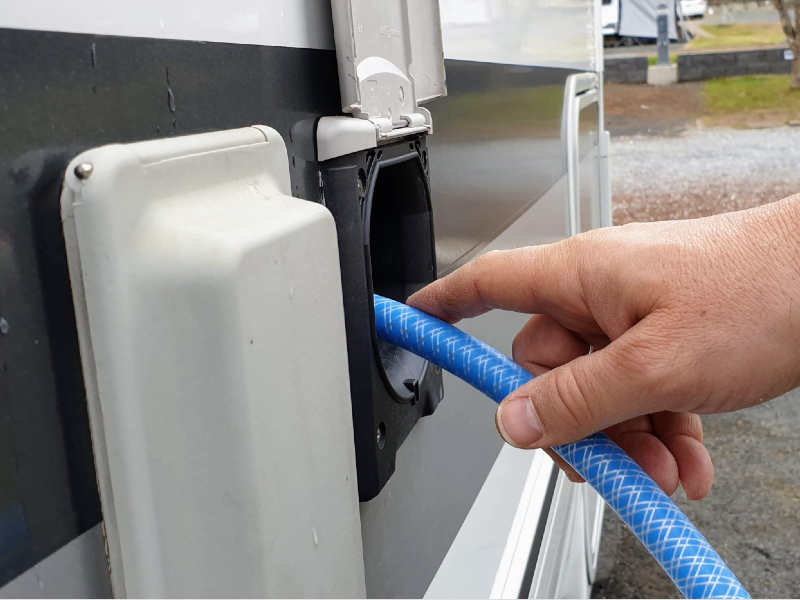
- Only use a potable-water-safe hose to connect to the freshwater inlet
- Sanitize your freshwater hose every three months
Always clean the ends of your freshwater hose and the freshwater inlet port to your RV with disinfecting wipes whenever you are hooking up your camper.
Adding an external inline water filter on your water hose reduces large particulates from entering the RV plumbing system.
You can also purchase higher-quality filters that prevent certain bacteria and viruses from passing and reduce chlorine or other chemicals that can cause odors or make water taste bad.
It’s best to clean the interior of your water hose every few months by pouring in five gallons of water with 1/2 cup of bleach and letting it sit for at least 12 hours. Then, plug the ends of the hose to keep the bleach solution in place to kill germs.
If you’ve had your hose for several years, consider replacing it to reduce the chance of germs breeding inside and passing into your freshwater tank.
RV Fresh Water Tank Sanitizing Wrap Up
Camping is much more convenient and comfortable when you have a supply of clean water at your disposal. Filling your freshwater holding tank is a smart move that allows you to cook, wash up, or use the toilet while on the road or when dry camping, so keeping it clean and germ-free is a top priority.
Don’t let bacteria take over your RV’s fresh water tank. Instead, use the tips in this guide to keep your RV water system clean so you never worry about unpleasant odors or bacteria that can make you or your family sick.
Using the right products and following our step-by-step guide above will help you master yet another critical RV chore, so you can enjoy every camping trip knowing your freshwater tank is safe for use!
Related Questions
- What are the dangers of not sanitizing your RV water tank regularly?
Not sanitizing your RV water tank regularly can lead to the growth of harmful bacteria and algae, which can contaminate your water supply and potentially cause health issues such as gastrointestinal distress.
Additionally, the buildup of these microorganisms can cause unpleasant tastes and odors, and over time, can damage the tank and plumbing system, leading to costly repairs.
- What are some signs that your RV water tank needs to be sanitized?
Some signs that your RV water tank needs to be sanitized include a foul or unusual odor coming from the water, a strange taste, or visible discoloration.
Additionally, if you experience water flow or pressure issues, it could indicate a buildup of bacteria or algae, signaling the need for sanitation.
- Are there any alternatives to bleach for sanitizing an RV water tank?
Yes, there are alternatives to bleach for sanitizing an RV water tank. You can use hydrogen peroxide, vinegar, or specially formulated RV water tank sanitizing products, all of which can effectively kill bacteria and other microorganisms without the harsh chemical smell of bleach.
- How can you prevent bacteria from growing in your RV water tank between sanitizations?
To prevent bacteria from growing in your RV water tank between sanitizations, it’s crucial to keep the tank dry when not in use as bacteria thrive in moist environments.
Additionally, always use clean, treated water for refills and avoid letting the water sit in the tank for long periods, as stagnant water can promote bacterial growth.
- What common mistakes do people make when sanitizing their RV water tanks and how can they be avoided?
Common mistakes people make when sanitizing their RV water tanks include not using the correct ratio of bleach to water, which can lead to insufficient sanitization or damage to the tank, and not thoroughly rinsing the tank after sanitization, which can leave a residual bleach taste.
These can be avoided by always following the manufacturer’s instructions for sanitization, typically a ratio of 1/4 cup of bleach for every 15 gallons of water, and ensuring a thorough rinse of the tank until the smell of bleach is no longer detectable.
"Of all the paths you take in life, make sure a few of them are dirt."
-- John Muir
